Last week I’ve come across an awesome tool named ‘Inspy’ that was written by gojhonny in early 2016. Unfortunately I haven’t heard about this tool earlier despite it being almost 2 years old, fortunately it was referenced by Offensive Security in the Kali 2017.3 release post as being part of the repo. Inspy is a LinkedIn enumeration tool written in Python that can be used for passive information gathering using information that is publicly available on LinkedIn. Inspy uses job titles and department names on LinkedIn profiles to find out who’s employed by a specific organization and in what role. Additionally this tool can also discover technologies that are being used by this organization by crawling job listing for specific keywords. Let’s have a look at the two different operation modes for this tool: EmSpy and TechSpy.
In EmSpy mode this tool searches for LinkedIn users that are employed by the organization using a wordlist. The wordlist that is included with this tool contains little over 300 job titles and department names that are being used to match the job title and/or department together with the company name on the LinkedIn profile. The second mode is called TechSpy. In TechSpy mode it crawls LinkedIn for technologies that are mentioned in a companies job listings, especially in the job description. This will give us an indication of what technologies are in use by the company such as Windows technology, applications, firewall brands and network equipment. At the time of writing this tutorial the TechSpy function unfortunately doesn’t work (anymore). This is probably caused by LinkedIn changing their schemes or, maybe even more likely, LinkedIn is blocking the queries that are generated from our network after a couple test runs. For this reason we will just focus on the EmSpy functionality for now and update this hacking tutorial when the TechSpy function is working properly again.
Running InSpy with EmSpy
Before we can run InSpy we have to install the tool on our system. You can install it by simply running the following command:
apt update && apt -y install inspy
Next we can print the usage instructions by running the following command:
inspy -h
InSpy - A LinkedIn enumeration tool by Jonathan Broche (@jonathanbroche)

positional arguments:
  company               Company name to use for tasks.

optional arguments:
  -h, --help            show this help message and exit
  -v, --version         show program's version number and exit

Technology Search:
  --techspy [file]Crawl LinkedIn job listings for technologies used by
                        the company. Technologies imported from a new line
                        delimited file. [Default: tech-list-small.txt]
  --limit int           Limit the number of job listings to crawl. [Default:
                        50]

Employee Harvesting:
  --empspy [file]Discover employees by title and/or department. Titles
                        and departments are imported from a new line delimited
                        file. [Default: title-list-small.txt]
  --emailformat string  Create email addresses for discovered employees using
                        a known format. [Accepted Formats: first.last@xyz.com,
                        last.first@xyz.com, first_last@xyz.com, last_first@xyz.com,
                        firstl@xyz.com, lfirst@xyz.com,
                        flast@xyz.com, lastf@xyz.com, first@xyz.com,
                        last@xyz.com]
This will print an overview of all options that are available to us with a description. To successfully run this tool there’s a few required parameters that we need to populate which are: --techspy[file]or --emspy[file]mode and the company name that we want to locate employees for. Since techspy is currently not working we will only look at emspy. The EmSpy mode takes only one argument which is the wordlist that contains the titles. The default wordlists are located in the following directory:
/usr/share/inspy/wordlists/
The wordlist directory contains 4 different wordlists from which 2 contain the titles and are meant to be used in EmSpy mode. The other 2 lists are meant to be used in the TechSpy mode.

Inspy wordlists
Now that we know where the wordlists are located we can use them in the following command to search for Google employees with a LinkedIn profile:
inspy --empspy /usr/share/inspy/wordlists/title-list-large.txt google
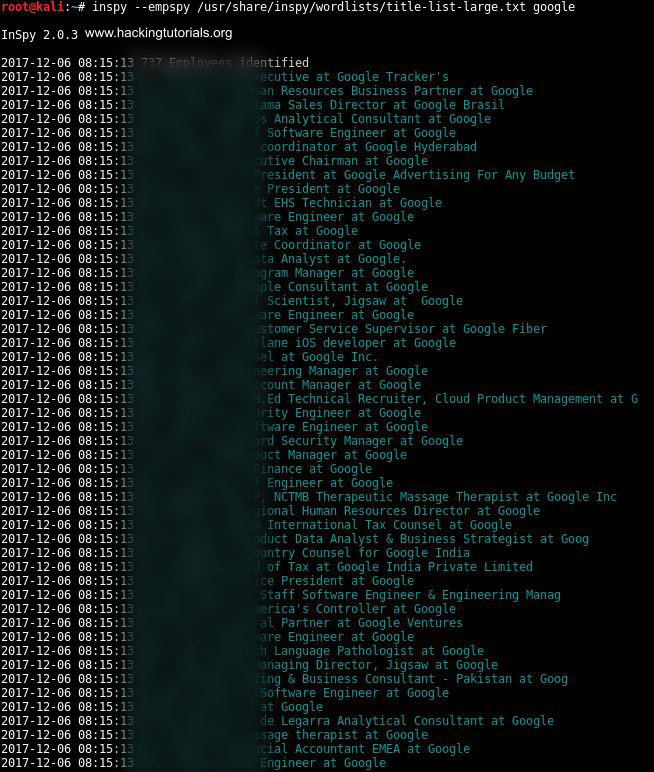
737 employees found in 63.7 seconds, that’s incredible!
InSpy found a total of 737 LinkedIn profiles that have Google mentioned in the job title. This is roughly 1% of the total staff (70k+ in 2017) employed by Google if all results were valid results. Personally I am amazed by the time it took to find these employees, only 63.7 seconds, which is incredibly fast. Expanding the number of entries might yield even better results though I must say that the included list is pretty effective already. Finally Inspy also has options to export the results in different formats; HTML, CSV & JSON. While these formats may come in handy in some cases I haven’t tested them.
Email format
Another possibly interesting feature is the ’emailformat’ option. This options allows you to specify a format for an e-mail address and export the search results as e-mail addresses. Let’s say you know that Google uses the firstname.lastname format we can specify this format and Inspy will generate a list of e-mail addresses according to this format. The following command searches for Google employees and generates a list of e-mail address in the firstname.lastname format:
inspy --empspy /usr/share/inspy/wordlists/title-list-large.txt --emailformat first.last@google.com google
There are several other formats that you can use with the ’emailformat’ option, all available options are listed in the help function.
Note: Even though the information found by InSpy is publicly available we’ve decided to blur the names in the search results.
This concludes the tutorial for this awesome hacking tool. Are you interested to learn more about other hacking tools? Make sure you’ll have a loot at our Metasploit, Exploitation and networking sections.